
When a plastic extruder is not feeding, the first instinct is often to raise barrel temperature, increase screw speed or push material harder. In an industrial extrusion line, those reactions often make the problem worse. If the screw is turning but the machine is not pulling material, the normal solid-conveying process has broken down somewhere between the hopper and the feed section.
This guide keeps the diagnosis in a practical order: confirm that the problem is really feeding loss, check the hopper, inspect the feed throat, review material condition, and only then consider screw wear or screw-to-material mismatch. That order matters because hopper bridging, feed throat overheating and material form problems are much more common than sudden screw failure.
For a broader symptom map, use the plastic extrusion troubleshooting guide. For routine checks that prevent feeding failures, see the extrusion line maintenance checklist.
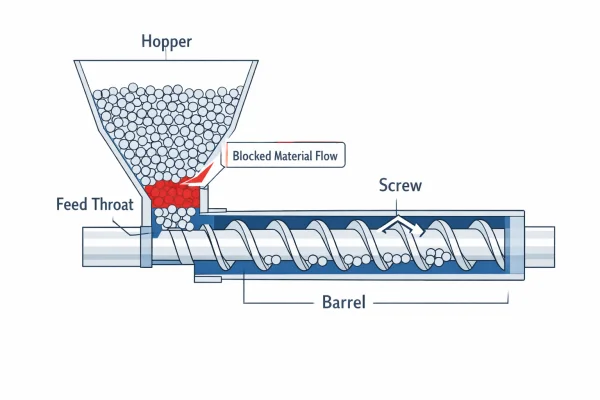
Quick Answer
If a plastic extruder is not feeding, do not start by changing die temperature or haul-off speed. Use this sequence:
- Confirm it is a feeding problem: low output, falling melt pressure, low motor load or screw rotation without material movement.
- Check the hopper: material level, slide gate position and hopper bridging.
- Check the feed throat: cooling water, inlet temperature, warm return flow, softening and blockage.
- Check the material: moisture, regrind ratio, fines, bulk density, pellet shape and lubricant level.
- Check mechanical causes last: screw wear, barrel clearance or screw-to-material mismatch.
| Symptom | First area to check | Typical cause |
|---|---|---|
| Hopper looks full but output drops | Hopper cone and outlet | Bridging or compacted fines. |
| Extruder feeds at startup, then gradually starves | Feed throat | Overheating or weak cooling flow. |
| Screw turns but does not pull material | Hopper, throat, material form | Starvation, sticking or poor friction balance. |
| Feeding gets worse after adding regrind | Hopper and material | Irregular flakes, fines or low bulk density. |
| Output has declined slowly for months | Screw/barrel | Wear or excessive clearance. |
1. Confirm It Is Really a Feeding Problem
Before troubleshooting, define the failure clearly. Operators may say the screw is turning but no melt comes out, output is weak, the machine runs empty, or material is not flowing from the hopper. These are not always the same problem.
A true feeding failure usually shows low or unstable output, falling melt pressure, lower-than-normal motor load, unstable discharge, or a hopper that looks full while the feed throat below is starved. If melt pressure is high, the issue may be a downstream restriction instead. If output exists but fluctuates after the die, the cause may be haul-off or cooling.
Get this distinction right before changing settings. If the screw is not receiving material correctly, die temperature and downstream adjustments cannot solve the root cause.
2. Start With Hopper Checks
The easiest checks should happen first. Confirm that enough material is present, that the slide gate or shut-off valve is fully open, and that material is actually reaching the throat. Do not rely only on what the top of the hopper looks like.
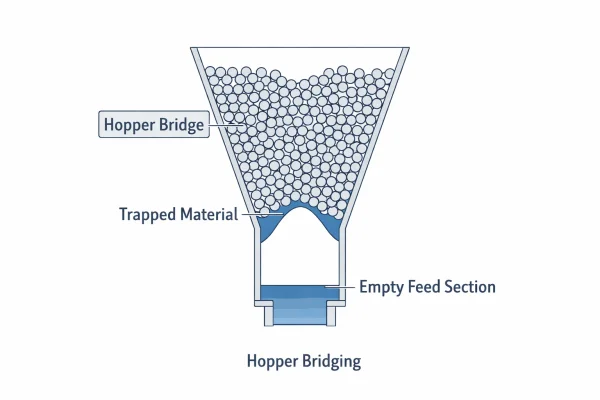
Hopper bridging happens when pellets, flakes or powder form an arch in the hopper cone. The hopper appears full, but material does not drop into the screw. It is common with regrind, thin flakes, powder-heavy blends, dusty material and low-bulk-density feedstock.
| Hopper check | What it tells you | First action |
|---|---|---|
| Material level | Whether starvation begins before the hopper outlet. | Refill and verify loader or conveying stability. |
| Slide gate position | Whether material is mechanically blocked. | Open fully and lock the position if needed. |
| Bridge test | Whether material is hanging in the cone. | Break the bridge with a clean non-metal tool and review regrind/fines. |
| Fines and dust | Whether material packs or aerates instead of flowing. | Screen regrind, reduce fines or improve material handling. |
| Hopper geometry | Whether the feedstock matches the hopper design. | Consider steeper cone, larger throat, vibrator or agitator. |
3. Check Feed Throat Cooling and Blockage
The feed throat is where many industrial feeding failures begin. Pellets must remain solid long enough to be gripped and conveyed by the screw. If the throat overheats, pellets soften too early, stick to metal surfaces and gradually seal the feed opening.
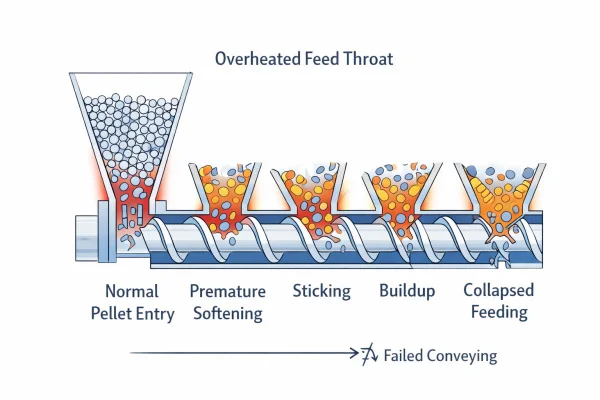
Check actual cooling flow, not just whether hoses are connected. Confirm inlet water temperature, warm return water, valve position, pump operation and scale or algae buildup in the circuit. A line that feeds well at startup and then slowly starves often has feed-throat cooling loss.
Physical blockage is less common but important. Degraded plastic, compacted fines, purge residue or foreign particles can block the opening. If blockage is suspected, stop safely and clean according to procedure. For deeper equipment cleaning, see clean extruder screw and barrel.
4. Check Material Condition and Form
If hopper and throat checks are normal, the material may be the cause. Wet pellets, excessive fines, high regrind ratio, irregular flakes, low bulk density or too much external lubricant can all reduce stable conveying.
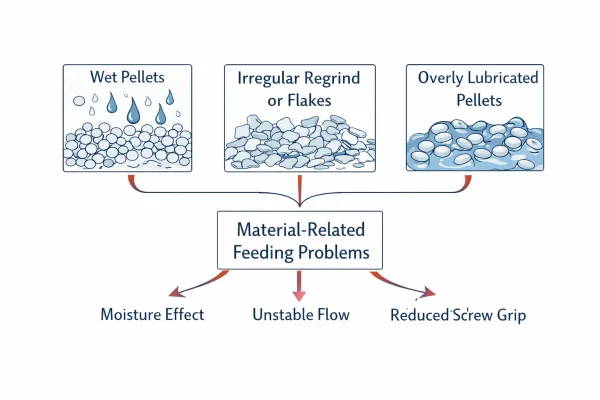
Moisture can reduce friction and cause unstable conveying, especially with PC, PMMA, PA, TPU and other moisture-sensitive materials. Regrind and flakes may not fall or compact like standard pellets. Slippery formulations can prevent the screw from establishing enough forward drag.
For drying control, see resin drying in plastic extrusion.
5. Suspect Screw or Mechanical Problems Only After Simple Checks
Mechanical wear should be considered, but not too early. A worn screw usually causes gradual decline, not sudden no-feed failure. Signs include lower output over time, lower motor load at the same RPM, harder startup, and greater sensitivity to small material changes.
Measure screw flight OD and barrel bore ID when wear is suspected. Compare clearance with original equipment records. If the problem began immediately after changing feedstock, the issue may be screw-to-material mismatch rather than damage. A screw designed for regular pellets may struggle with powder-rich blends, low-bulk-density flakes or irregular recycled input.
6. What Not to Do
Do not blindly raise barrel temperature. If early softening at the throat is the cause, more heat makes sticking worse.
Do not keep increasing screw speed. A starved screw does not become healthy by rotating faster.
Do not assume the die or downstream equipment is the main issue. If material is not entering the screw, downstream corrections distract from the cause.
Do not jump straight to replacing the screw. Rule out hopper, throat and material causes first.
7. Practical Troubleshooting Sequence
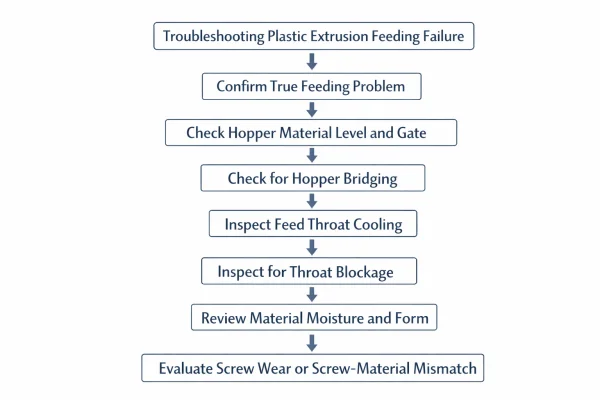
| Step | Check | Move on only when |
|---|---|---|
| 1 | Output, melt pressure and motor load | You know this is feeding loss, not downstream restriction. |
| 2 | Hopper level, gate and bridging | Material is reaching the throat consistently. |
| 3 | Feed-throat cooling and blockage | Pellets stay solid and the opening is clear. |
| 4 | Moisture, fines, regrind and material form | The material can flow and compact consistently. |
| 5 | Screw wear or screw mismatch | Simple causes have been ruled out. |
This order starts with the fastest and most common causes. At each step, correct one variable and test before changing another.
8. Prevent Feeding Problems Before They Stop Production
Treat feeding failure as a system problem. Daily checks should include feed-throat cooling flow, material level, loader stability, hopper cleanliness and visible fines. After material changes, clean the hopper and throat area, document the regrind ratio, and record whether bridging or surging appears.
During commissioning, record baseline feed-throat water temperature, cooling flow, screw RPM, motor amperage and melt pressure at stable output. When feeding problems appear months later, comparing current values with baseline often identifies the deviation quickly.
Feeding Problem vs Other Line Problems
| Situation | Use |
|---|---|
| Screw turns but material is not entering or conveying | This not-feeding guide. |
| Bubbles, black specks, wall variation or cutting problems are already visible | Plastic extrusion troubleshooting. |
| Feeding is stable but screw/barrel residue must be cleaned | Clean extruder screw and barrel. |
| Moisture-sensitive resin may be unstable | Resin drying in plastic extrusion. |
| You want routine checks to prevent feeding failures | Extrusion line maintenance checklist. |
FAQ
Why is my plastic extruder screw turning but not pulling material?
The most common causes are hopper bridging, feed throat overheating, physical throat blockage, wet or inconsistent material, and poor screw-to-material match. Check hopper and feed throat first.
What does material not flowing from the hopper usually mean?
It often means the hopper is bridged, the gate is partly closed, fines are compacted near the outlet, or the material form does not flow well through the hopper cone.
Can feed throat overheating stop an extruder from feeding?
Yes. If pellets soften too early at the feed throat, they stick instead of entering the screw as a solid bed. This can block normal conveying even while the screw keeps rotating.
Can wet plastic cause extrusion feeding problems?
Yes. Moisture can reduce friction and make feeding unstable, especially with hygroscopic materials such as PC, PMMA, PA and TPU.
Should I increase screw speed when the extruder is not feeding?
Usually no. If material is not entering or conveying correctly, higher screw speed often increases instability and heat without fixing the cause.
When should I suspect screw wear?
Suspect screw wear when output has declined gradually over time, motor load is lower than baseline, and the line becomes increasingly sensitive to normal material variation.
Jason Shen
Founder and Lead Engineer, Jinxin ExtruderJason Shen leads Jinxin Extruder's single screw extrusion line projects, with hands-on experience in machine configuration, tooling adjustment, factory testing and extrusion troubleshooting.
Inquiry
Email Your Line Requirements
For an accurate quotation, include your target product, material, size range, expected output, factory voltage and any product drawing or sample requirements.