
Most plastic extrusion problems become expensive when operators adjust the line before they know what kind of problem they are seeing. A rough surface, bubbles, black specks, unstable output, wall thickness variation and bad cuts may all look urgent, but they do not come from the same part of the line.
The fastest way to troubleshoot an extrusion line is to separate three questions:
- What is the visible defect?
- Which station most likely introduced it first?
- What is the first controlled check before changing settings?
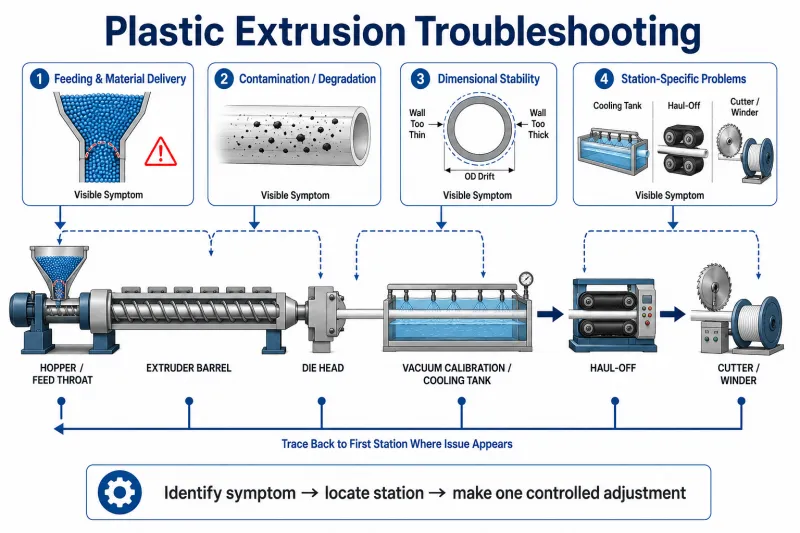
This guide is the top-level troubleshooting map. Use it to classify the issue, make one controlled correction at a time, and then move to a deeper guide when the symptom points to feeding, contamination or dimensional stability.
Quick Answer
Plastic extrusion problems usually come from one of five areas: material feeding, melt temperature and shear, contamination or degradation, die and downstream alignment, or speed mismatch between extruder output and haul-off.
Start by naming the defect, then check where it first appears on the line. If the product is already wrong at the die exit, inspect the die and melt condition first. If it looks correct at the die but changes during sizing, cooling, hauling or cutting, troubleshoot by station instead of changing barrel temperatures blindly.
Use this order:
| Step | What to do | Why it matters |
|---|---|---|
| 1 | Record the defect and when it appears | Prevents guessing from memory. |
| 2 | Locate the first station where the defect is visible | Finds the earliest failure point. |
| 3 | Check material, temperature, pressure, speed and cooling trends | Separates process drift from hardware failure. |
| 4 | Make one adjustment at a time | Keeps the result traceable. |
| 5 | Route the issue to the deeper guide if needed | Avoids turning the hub into a mixed-cause article. |
Before You Change Any Setting
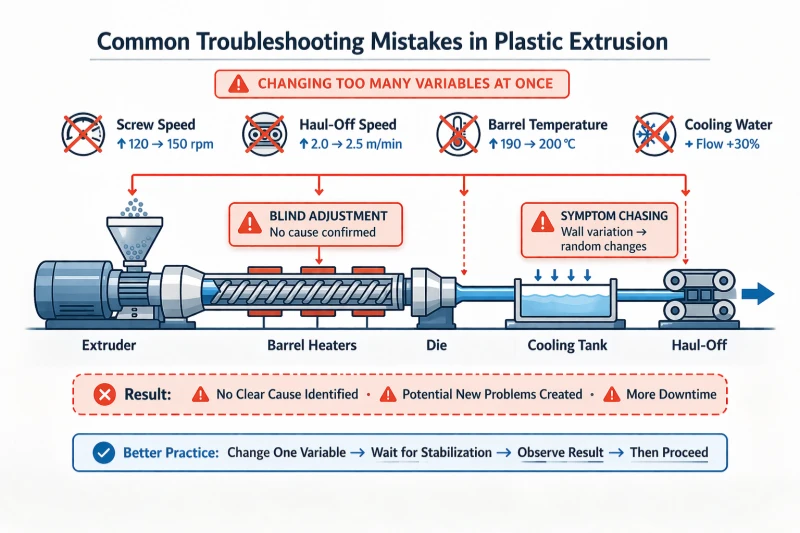
Many troubleshooting cycles fail because too many variables change at once. Before adjusting screw speed, haul-off speed, barrel temperature, die temperature, cooling water or vacuum, capture a small baseline:
| Baseline item | What to record |
|---|---|
| Defect | Rough surface, bubbles, black specks, wall variation, output loss, poor cut, unstable size. |
| First visible location | Die exit, calibration, cooling tank, haul-off, cutter or final handling. |
| Current settings | Temperatures, screw speed, haul-off speed, vacuum, cooling water temperature, pressure trend. |
| Material condition | Resin grade, drying condition, regrind ratio, color/masterbatch change, contamination risk. |
| Recent change | Mold change, screen change, material batch change, startup, speed increase, maintenance event. |
If several people adjust the line at the same time, stop and reset the diagnosis. Extrusion has delayed responses. A temperature or speed change may take time to show in the product, and stacked changes make the real cause harder to identify.
Common Plastic Extrusion Problems: Symptom, Cause and First Fix
Use these blocks as the first diagnostic screen. They are not a substitute for product-specific process settings, but they help the team decide where to look first.
1. Rough Surface, Sharkskin or Melt Fracture
| Field | Diagnostic note |
|---|---|
| Symptom | The surface looks dull, scaly, bumpy, torn or regularly rough. It may appear at the die exit or shortly after forming. |
| Likely causes | Melt temperature too low, shear rate too high, die lip restriction, rough die land, excessive line speed, unsuitable material flow behavior. |
| First checks | Check die and melt zone temperatures, compare actual line speed with normal production, inspect die lip buildup or damage, confirm whether the defect appears immediately at the die. |
| First fixes | Increase melt or die temperature gradually, reduce screw RPM or line speed, clean the die lip, verify that the die gap and land are not damaged or blocked. |
| When to stop | Stop changing speed and temperature if the roughness stays in the same physical location or appears with die lines. Inspect die tooling before adding more process changes. |
Route deeper: if the roughness appears with contamination or black specks, use the black specks guide. If the defect stays fixed at the die exit, inspect the die and tooling before changing more process settings.
2. Bubbles, Voids or Foaming
| Field | Diagnostic note |
|---|---|
| Symptom | Holes, bubbles, silver streaks, foam marks or internal voids appear inside or on the surface of the product. |
| Likely causes | Moisture in resin, trapped air in the feed zone, unstable feeding, excessive volatile content, poor venting, too much regrind or contaminated material. |
| First checks | Check drying time and temperature, inspect hopper flow, look for bridging or starvation, verify whether bubbles increased after a material batch or weather change. |
| First fixes | Dry the resin to supplier requirements, stabilize feeding, reduce unnecessary regrind, check feed throat cooling, verify vent or vacuum function if the line has venting. |
| When to stop | If drying correction does not reduce the defect, do not keep raising temperature. Move to feeding and material delivery diagnosis. |
Route deeper: Why Is My Extruder Not Feeding?
3. Black Specks, Burnt Particles or Contamination
| Field | Diagnostic note |
|---|---|
| Symptom | Dark specks, burnt streaks, carbon particles, colored contamination or random dirty marks appear in the product. |
| Likely causes | Degraded polymer in barrel or die dead zones, dirty material, overloaded screen pack, poor purging, contamination from regrind or handling. |
| First checks | Check whether specks appear after startup, material change or long heat soak; inspect purge result; check screen pack condition where filtration is used; look for die buildup. |
| First fixes | Purge with suitable material, clean die and low-flow areas, replace loaded screen pack if contamination is confirmed there, isolate material batch or regrind source. |
| When to stop | Do not assume every black speck is solved by filtration. If specks return after screen replacement, trace degradation and material handling sources. |
Route deeper: Black Specks in Extrusion
4. Wall Thickness Variation, OD Drift or Unstable Size
| Field | Diagnostic note |
|---|---|
| Symptom | Wall thickness, outer diameter, meter weight, width or profile dimension drifts, cycles or changes after speed adjustment. |
| Likely causes | Output fluctuation, haul-off speed mismatch, die centering error, unstable vacuum sizing, uneven cooling, product still warm at the puller or cutter. |
| First checks | Compare extruder output trend with haul-off speed trend, measure at die exit and after calibration, check vacuum level, cooling water distribution and real haul-off speed. |
| First fixes | Stabilize one side of the ratio first: output or haul-off speed. Re-center die only if directional thickness is already visible at the die. Correct vacuum or cooling if the product changes downstream. |
| When to stop | Do not jump to advanced hardware. If the issue follows haul-off speed, cooling, die alignment or feeding instability, diagnose those causes before considering pressure-stability upgrades. |
Route deeper: wall thickness variation in plastic extrusion
5. Low Output or Unstable Output
| Field | Diagnostic note |
|---|---|
| Symptom | The line produces less kg/h than expected, output fluctuates, feed becomes irregular, or the extruder cannot hold stable pressure. |
| Likely causes | Hopper bridging, feed throat overheating, screw or barrel wear, material bulk density change, blocked screen, wrong temperature profile, drive or speed instability. |
| First checks | Observe hopper flow, check feed throat cooling, compare motor load and melt pressure, inspect material condition, check whether the problem began after a resin or screen change. |
| First fixes | Clear bridging, restore feed throat cooling, dry or condition material, replace a blocked screen pack if confirmed, inspect screw/barrel wear if output loss is long-term and repeatable. |
| When to stop | If output stays low after feeding and screen checks, avoid compensating only with higher RPM. Mechanical wear or material mismatch may need inspection. |
Route deeper: Why Is My Extruder Not Feeding?
6. Gels, Fisheyes or Unmelted Particles
| Field | Diagnostic note |
|---|---|
| Symptom | Small clear gels, fisheyes, hard particles or unmelted points appear in sheet, profile, tube or pipe. |
| Likely causes | Low melt temperature, poor mixing, wrong screw design for the resin, high contamination load, degraded material breaking loose from barrel or die. |
| First checks | Check temperature profile, resin grade, masterbatch dispersion, screen pack condition, die cleanliness and whether the defect is hard contamination or unmelted polymer. |
| First fixes | Adjust temperature gradually, improve material preparation, purge and clean dead zones, review screen mesh only when contamination is confirmed. |
| When to stop | If gels remain after temperature and purging checks, separate material quality, screw design and contamination instead of treating them as one issue. |
7. Poor Cut Quality, Deformation or Winding Problems
| Field | Diagnostic note |
|---|---|
| Symptom | Cut face is angled or rough, length varies, pipe flattens at cutting, flexible product winds unevenly or shows tension marks. |
| Likely causes | Dull blade, poor cut synchronization, product not fully cooled, clamp pressure too high, unstable haul-off speed, coiler tension mismatch. |
| First checks | Check blade condition, encoder or length signal, product temperature before cutter, actual haul-off speed and clamp or winding tension. |
| First fixes | Replace or sharpen blade, correct cutter timing, improve cooling before cutting, adjust clamp pressure or coiler tension. |
| When to stop | If the product is already dimensionally unstable before the cutter, do not blame the cutter first. Move upstream to cooling, haul-off or calibration. |
Printable Station Diagnostic Map
Use this map when the product is wrong but the root cause is not obvious. Start with the first station where the defect becomes visible.
| Symptom pattern | Likely station to check first | First check | Next route |
|---|---|---|---|
| Asymmetric shape or uneven wall at die exit | Die / tooling | Die centering, flow distribution, buildup at lip | Wall-thickness guide or die maintenance |
| Die lines or repeated longitudinal marks | Die / tooling | Die land surface, scratches, contamination at die exit | Black specks guide if contamination appears |
| Melt fracture or sharkskin at die exit | Die / tooling / melt condition | Melt temperature, line speed, die lip condition | Rough surface block above |
| Product shape exists but will not hold size | Calibration / sizing | Vacuum level, sizing sleeve condition, seal, entry alignment | Wall-thickness guide |
| OD or profile size drifts during sizing | Calibration / cooling | Vacuum leaks, water level, calibrator alignment | Wall-thickness guide |
| Dimensions drift later in the cooling path | Cooling | Water temperature, flow distribution, blocked spray, cooling reserve | Wall-thickness guide |
| Product still soft at haul-off or cutter | Cooling | Cooling length, water temperature, line speed vs cooling capacity | Reduce speed or improve cooling |
| Wall thickness changes with haul-off speed | Haul-off / output ratio | Actual haul-off speed, belt grip, output trend | Wall-thickness guide |
| Output fluctuates before the die | Hopper / feed throat / screw | Bridging, feed throat cooling, material condition, screw wear | Not-feeding guide |
| Black specks or burnt streaks | Material path / barrel / die / screen | Purge result, material batch, dead zones, screen condition | Black specks guide |
| Cut length inconsistent | Cutter | Encoder signal, length counter, blade timing | Cutter settings after speed is stable |
| Product deforms at cut | Cooling -> cutter | Product temperature before cutter, clamp pressure | Cooling first, cutter second |
This table is a first-response reference, not a guarantee of one-cause diagnosis. Its value is to make the first move faster and reduce blind parameter changes.
Symptom-First or Station-First?
Both methods are useful, but they answer different questions.
| Method | Use when | Example |
|---|---|---|
| Symptom-first | The product defect is visible, but the source is unclear. | Black specks, bubbles, rough surface, wall thickness drift. |
| Station-first | You already know where the defect first appears on the line. | Product looks correct at die exit but loses size in calibration; cut length becomes unstable at cutter. |
When in doubt, walk the line from the die exit downstream. Do not diagnose only from the control cabinet. Many problems that look like general extrusion instability begin at one physical station.
How to Make a Controlled Adjustment
Once the likely cause is clear, adjust only one variable at a time.
| Variable | Safe diagnostic use |
|---|---|
| Temperature | Change gradually and wait for the line to stabilize before judging the result. |
| Screw RPM | Use to test output response, but do not change it together with haul-off speed unless you are intentionally preserving draw ratio. |
| Haul-off speed | Use to correct wall thickness only after output stability is known. |
| Vacuum / calibration | Adjust after confirming die exit shape is acceptable. |
| Cooling water | Check flow and uniformity before changing only set temperature. |
| Screen pack | Replace when pressure or contamination evidence supports it; do not treat it as the answer to every surface defect. |
Write down the change, the time, and the result. A small production log often saves more time than another random adjustment.
When the Problem Is Bigger Than One Symptom
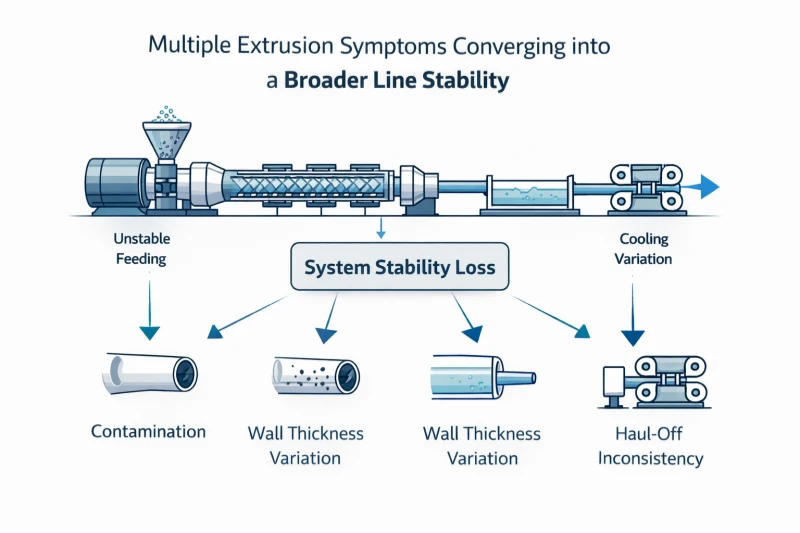
If several defects appear together, treat the line as a system problem.
Examples:
- feeding instability plus wall thickness drift;
- black specks plus temperature instability;
- low output plus high pressure trend;
- product looks acceptable at die exit but deforms after cooling and cutting;
- startup is unstable after a material, mold or screen change.
In these cases, do not chase the loudest symptom only. Return to the baseline and find the first point where the line loses stability. An upstream error can be amplified by downstream stations.
The practical rule is simple: fix the first failure point before correcting downstream symptoms.
Where This Troubleshooting Hub Sends You Next
| If the main issue is… | Use this next |
|---|---|
| Hopper bridging, feed throat overheating, unstable feed or low output | Why Is My Extruder Not Feeding? |
| Black specks, burnt material, contamination or repeated dirty marks | Black Specks in Extrusion |
| Wall thickness drift, OD variation, eccentricity or unstable meter weight | wall thickness variation in plastic extrusion |
| Recurring issues that should have been caught earlier | Extrusion Line Maintenance Checklist |
| Problems after delivery, startup or repeated production instability on a Jinxin-built line | Service and Support |
This hub does not push a product as the default fix. Hardware options only make sense after the real cause is confirmed. When the confirmed cause is equipment selection rather than settings, Jinxin’s custom plastic extrusion lines show how each station is specified around the product.
FAQ
What is the fastest way to troubleshoot an extrusion line?
Name the defect, locate where it first appears, and make one controlled check before changing settings. Most wasted time comes from adjusting temperature, screw speed and haul-off speed together before the problem class is clear.
What are the most common plastic extrusion problems?
Common problems include rough surface or sharkskin, bubbles or voids, black specks, gels or fisheyes, low or unstable output, wall thickness variation, OD drift, poor cut quality and cooling-related deformation.
How do I know whether the problem is material, machine or downstream?
Check where the symptom first becomes visible. Problems already visible at the die exit usually involve melt condition, die tooling, material or contamination. Problems that appear after sizing, cooling, pulling or cutting should be checked station by station.
Should I change temperature first?
Not always. Temperature is only one variable. If the symptom is caused by unstable feeding, die buildup, poor cooling, haul-off slip or cutter timing, temperature changes may hide the cause and create new instability.
Why does wall thickness change when line speed changes?
Wall thickness depends on the relationship between extruder output and haul-off speed. If one changes without the other, material per meter changes. If the ratio is stable but the wall still drifts, check die centering, feeding stability, vacuum sizing and cooling.
Are black specks always caused by a bad screen pack?
No. A loaded screen can contribute to contamination, but black specks can also come from degraded material in the barrel or die, poor purging, dirty material, dead zones or overheating. Trace the source before changing hardware.
Need Help Diagnosing a Jinxin Line?
Send the main symptom, when it appears, the material, recent changes, and a short video showing the product from die exit to downstream. For Jinxin-built lines, our team can help identify the problem category and the next check before your operators make more adjustments.
Jason Shen
Founder and Lead Engineer, Jinxin ExtruderJason Shen leads Jinxin Extruder's single screw extrusion line projects, with hands-on experience in machine configuration, tooling adjustment, factory testing and extrusion troubleshooting.
Inquiry
Email Your Line Requirements
For an accurate quotation, include your target product, material, size range, expected output, factory voltage and any product drawing or sample requirements.