
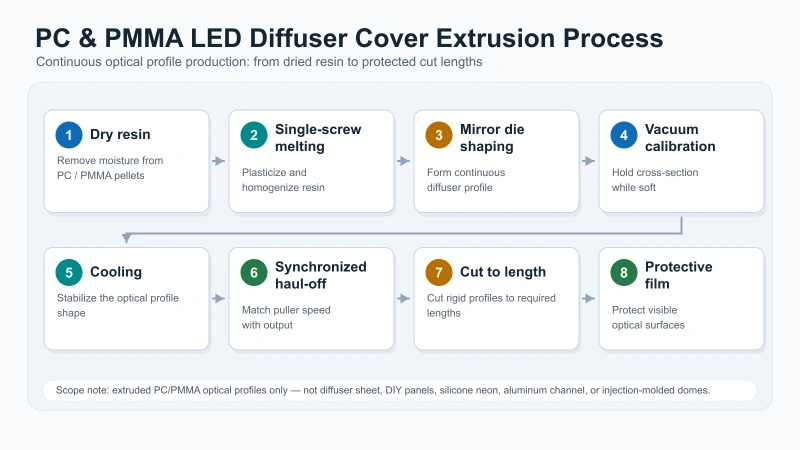
LED diffuser covers for linear lighting are often made by continuous plastic profile extrusion. PC or PMMA optical resin is dried, melted in a single-screw extruder, shaped through a mirror-polished profile die, fixed by vacuum calibration, cooled, pulled at a synchronized speed, then cut to length and protected for packing.
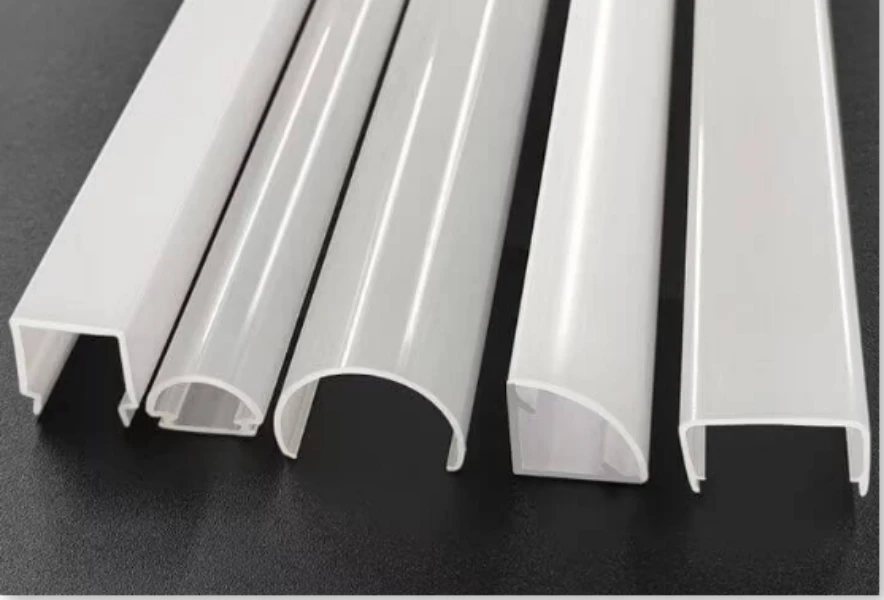
This article focuses on extruded PC and PMMA diffuser profiles: LED tube covers, diffuser strips, lampshade profiles and transparent optical covers with a continuous cross-section. It does not cover diffuser sheets or plates, finished cover sourcing, DIY light diffusers, aluminum LED channels, silicone neon strips, injection-molded lamp domes, or PVC window profiles.
For the complete equipment configuration behind this process, see Jinxin’s PC and PMMA profile extrusion line.
Quick Answer
A linear LED diffuser cover is made by extruding PC or PMMA into a continuous optical profile. The basic manufacturing sequence is:
- select PC or PMMA resin and the required optical formulation;
- dry the resin, especially PC, before processing;
- feed the resin into a high-torque single-screw extruder;
- melt and homogenize the polymer at the correct temperature window;
- shape the melt through a mirror-polished profile die;
- hold the cross-section by vacuum calibration and cooling;
- pull the profile with synchronized haul-off;
- cut it to length and add protective film when the surface requires it.
The frosted, opal or milky appearance is usually created by the material formulation, light-diffusing additives and tooling or surface design. It is not the same process as making flat diffuser sheet, printing a DIY diffuser, or molding a dome-shaped lamp cover.
1. What Type of LED Diffuser Cover Is This Article About?
The phrase “LED diffuser cover” is broad. Search results can point to sheet material, finished lighting accessories, DIY photography panels, flexible silicone neon strips, injection-molded covers, aluminum LED profiles, or the plastic insert that slides into a lighting channel.
This article is narrower. It covers the plastic diffuser profile itself when it is produced as a continuous extruded shape. The profile may be round, semi-round, flat, arc-shaped, D-shaped, milky white, frosted, transparent or light-diffusing, depending on the drawing and resin.
The production line does not manufacture the complete lamp. LED chips, PCB boards, aluminum housings, end caps and final luminaire assembly are separate stages outside this extrusion scope.
2. PC vs PMMA: The Material Choice Comes First
PC and PMMA can often be processed on a similar single-screw profile extrusion line, but they are chosen for different reasons.
| Material | Why buyers choose it | Process attention |
|---|---|---|
| PC, or polycarbonate | Higher impact resistance, stronger protective covers, tougher industrial and transport lighting parts | Drying, overheating control, internal stress, yellowing, bubbles, clarity and stable downstream handling |
| PMMA | High transparency, good gloss and decorative optical appearance | Pre-drying when required, temperature control, scratches, brittle cutting behavior and clean die flow |
PC is commonly selected when the diffuser cover must resist impact or heat better. PMMA is often selected when high clarity and gloss are the priority. Neither material should be chosen only from a generic article. The resin grade, cross-section, wall thickness, surface finish and light-transmission target must be confirmed for the actual project.
3. Drying and Material Preparation
Drying is critical for optical profile extrusion. PC is moisture-sensitive. If wet PC enters the barrel, moisture can cause bubbles, splay marks, loss of transparency and weaker surface quality. A typical starting reference for many PC grades is around 100-120°C for several hours, but the final drying condition should follow the resin supplier’s technical data sheet.
PMMA may also need pre-drying depending on grade and storage condition. For both materials, the goal is not simply to remove visible water. It is to protect optical clarity and reduce defects before the resin reaches the die.
Diffuser additives may also be blended before or during processing. These can include light-scattering particles, opal or milky masterbatch, or other formulation systems selected by the material supplier. The extrusion line must process that formulation consistently without burning, streaking or separating it.
4. Melting in the Single-Screw Extruder
After drying, resin enters the high-torque single-screw extruder. The screw conveys, compresses, melts and homogenizes the polymer so the die receives a stable melt.
This article intentionally does not specify unpublished extruder model numbers. The PC Profile product page confirms the single-screw process scope, and the correct extruder platform depends on the profile drawing, material, surface requirement and output target.
Typical starting temperature references differ by material. PC profile extrusion is often around 260-300°C, while PMMA profile extrusion is often around 200-250°C. These are starting references, not universal recipes. Screw design, die structure, resin grade, output rate and optical requirement can all change the final temperature profile.
For a broader explanation of continuous melting and shaping, see what plastic extrusion is.
5. Shaping Through a Mirror-Polished Profile Die
The molten resin is pushed through a profile die matched to the diffuser drawing. The die defines the starting cross-section: round tube, arc cover, flat strip, U-like cover, irregular profile or another drawing-based shape.
For optical PC and PMMA profiles, the die surface matters more than in many opaque industrial profiles. A rough or poorly balanced flow path can create die lines, drag marks, ripples, flow marks or uneven gloss. Mirror-polished tooling helps reduce visible surface defects, but die polishing alone cannot guarantee clarity if drying, melt temperature, cooling and haul-off are unstable.
The die opening is not the finished dimension by itself. The hot profile can still change after leaving the die because of draw-down, vacuum calibration, cooling shrinkage and puller speed. This is why die design must be reviewed together with the downstream process.
For the role of this component in extrusion, see what an extrusion die does.
6. Vacuum Calibration and Cooling
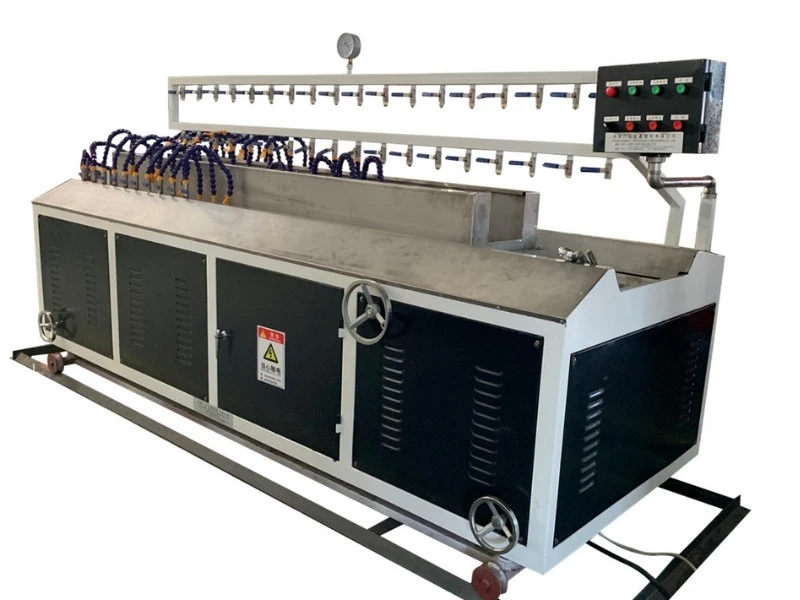
When the profile exits the die, it is still hot and shape-sensitive. Vacuum calibration supports the profile while the cross-section is being fixed. Cooling then removes heat so the shape becomes stable enough for traction and cutting.
This stage is especially important for diffuser covers because the visible surface and the optical path are part of the product value. Poor support can lead to sagging, width drift, surface marks or inconsistent fit with the lighting housing.
Calibration and cooling must be selected around the actual profile:
| Profile condition | Why calibration and cooling matter |
|---|---|
| Thin arc or cover profile | Needs support to avoid sagging or width drift |
| Transparent surface | Contact, water quality and handling can affect scratches or marks |
| Frosted or opal output | Cooling must preserve shape without creating visible stress or deformation |
| Rigid transparent tube | Diameter stability and clean downstream handling become important |
Vacuum calibration holds the outer shape; it does not replace stable melt flow. If the extruder output changes or haul-off speed is not synchronized, dimensions can still drift.
7. Haul-Off, Cutting and Protective Film
The haul-off pulls the profile through the line. Its speed must match the extruder output. If the puller runs too fast for the melt output, the profile can become thinner or narrower. If it runs too slowly, the profile can become heavy, oversized or distorted.
For visible PC and PMMA diffuser covers, the contact surfaces of the haul-off also matter. Belt pressure, profile temperature and traction stability must be controlled so the finished surface is not scratched or imprinted.
The cutting unit then cuts the profile to the required length. Many lighting profiles are cut into commercial lengths for packing or later assembly. Cutting quality depends on profile cooling, rigidity, blade selection, clamping and synchronization.
For high-gloss or transparent profiles, a protective PE film applicator can be added so the visible surface is protected during collection, packing and shipment. This does not create the diffuser effect; it protects the finished optical surface after extrusion.
The relationship between output and puller speed is explained in extruder output and haul-off speed synchronization.
8. How the Frosted, Opal or Milky Appearance Is Produced
A diffuser cover does not scatter light simply because it is plastic. The light-diffusing effect comes from material formulation, surface design and profile geometry.
Common approaches include:
- adding light-scattering particles or opal masterbatch to the resin;
- using a milky white or frosted formulation selected for the target light transmission;
- designing the wall thickness and profile geometry to hide LED points;
- creating a textured or matte surface through tooling when the product requires it;
- using co-extrusion only when the design needs separate clear, frosted or opaque zones.
The target is usually a balance. Higher diffusion can hide LED hotspots, but it can also reduce light transmission. Higher transmission can improve brightness, but LED dots may become visible. This is why the buyer should define the application and optical target before the line and tooling are finalized.
9. Common Defects in PC and PMMA Diffuser Profile Extrusion
Most visible defects are not caused by one isolated machine setting. They come from the way drying, melting, die flow, calibration, cooling and handling interact.
| Defect | Likely process areas to inspect |
|---|---|
| Bubbles or splay marks | Resin drying, moisture control, material storage and melt temperature |
| Yellowing | Overheating, excessive residence time, unsuitable temperature setting or poor purging |
| Black spots | Dead zones in barrel, adaptor or die where material carbonizes over time |
| Die lines or drag marks | Die polishing, flow balance, contamination, melt stability and surface contact |
| Flow marks or ripples | Melt uniformity, die flow, temperature profile and haul-off stability |
| Scratches | Downstream guides, haul-off contact, cutting, collection and packing protection |
| Width or shape drift | Calibration support, cooling, output stability and puller synchronization |
For symptom-based troubleshooting across extrusion processes, see common extrusion problems and how to fix them.
10. Extrusion vs Sheets, Injection Molding and Silicone Neon
Manual AIO checks and SERP results repeatedly mix several different diffuser manufacturing routes. The differences matter.
| Route | What it usually makes | Is it the scope of this article? |
|---|---|---|
| PC/PMMA profile extrusion | Linear diffuser covers, LED tube covers, optical strips and drawing-based continuous profiles | Yes |
| Sheet or plate production | Flat diffuser sheet, light panels or plate stock | No |
| Injection molding | Dome covers, end caps, lenses or complex 3D lamp parts | No |
| Silicone extrusion or co-extrusion | Flexible LED neon sleeves or waterproof flexible lighting | No |
| DIY diffuser making | Home, photography or hobby light diffusion panels | No |
| Aluminum LED channel production | Metal housing or rail that may hold the plastic diffuser | No |
The scope boundary protects the article from cannibalizing the PC Profile equipment page and from drifting into consumer lighting accessories. The article answers how the extruded plastic diffuser profile is made, then sends equipment readers to the matching Jinxin line page.
Conclusion
Extruded LED diffuser covers are made by preparing PC or PMMA resin, drying it, melting it in a single-screw extruder, shaping it through a mirror-polished profile die, stabilizing the cross-section through vacuum calibration and cooling, then pulling, cutting and protecting the finished profile.
The optical result depends on more than the die shape. Material formulation, light-diffusing additives, drying, temperature control, calibration, cooling and scratch-free handling all affect the final diffuser cover.
If you are planning a PC or PMMA diffuser profile project, contact Jinxin with your profile drawing or sample photo, resin grade, target surface finish, light-transmission requirement, cutting length and expected production target. Jinxin can review the complete PC/PMMA profile extrusion line configuration around the actual product instead of treating the extruder as the whole process.
FAQ
Are LED diffuser covers made by extrusion?
Linear LED diffuser covers and optical profiles are commonly made by extrusion. PC or PMMA resin is melted and pushed through a profile die to form a continuous cross-section, then calibrated, cooled, pulled and cut. Molded domes, panels and flexible silicone neon products use different production routes.
What material is used for extruded LED diffuser covers?
PC and PMMA are common materials for rigid optical diffuser profiles. PC is selected when impact resistance and toughness are important. PMMA is selected when high transparency and gloss are the priority. The exact grade and optical formulation should be confirmed with the resin supplier and the product drawing.
Why must PC resin be dried before LED diffuser profile extrusion?
PC absorbs moisture from the air. If wet PC is processed, moisture can create bubbles, splay marks, weak surface quality and loss of optical clarity. A common starting reference is around 100-120°C for several hours, but the resin supplier’s technical data sheet should control the final drying setting.
What should be controlled when switching between PC and PMMA diffuser profile extrusion?
When production switches between PC and PMMA diffuser profiles, the process team should control resin drying, barrel purging, temperature transition, die cleaning and first-piece optical inspection. The goal is to avoid mixed-material contamination, bubbles, yellowing, die lines and unstable dimensions before normal production resumes.
What processing temperature is used for PC and PMMA optical profiles?
Typical starting references are often around 260-300°C for PC and around 200-250°C for PMMA. These are not universal recipes. Final temperature settings depend on resin grade, screw design, die structure, output target and optical surface requirement.
How is the frosted or milky diffuser appearance produced?
The frosted, opal or milky diffuser effect is usually produced by the resin formulation, light-scattering additives, wall design and sometimes tooling texture. It is not simply a separate coating step, and it should not be confused with flat diffuser sheet production.
What causes die lines or flow marks on clear diffuser profiles?
Die lines and flow marks can come from die polishing, unbalanced die flow, contamination, unstable melt temperature, poor drying, excessive shear or downstream surface contact. Optical PC and PMMA profiles require both clean tooling and stable process control.
Is an LED diffuser cover the same as an aluminum LED channel?
No. The diffuser cover is the plastic optical profile that spreads or softens the light. The aluminum channel is the metal housing that may hold the LED strip and the diffuser cover. They are different products and use different manufacturing processes.
Jason Shen
Founder and Lead Engineer, Jinxin ExtruderJason Shen leads Jinxin Extruder's single screw extrusion line projects, with hands-on experience in machine configuration, tooling adjustment, factory testing and extrusion troubleshooting.
Inquiry
Email Your Line Requirements
For an accurate quotation, include your target product, material, size range, expected output, factory voltage and any product drawing or sample requirements.