
Extrusion die cleaning is not just removing visible plastic from the outside of the tooling. The die lip, land area, flow channels, sealing faces and storage surfaces all affect the next startup. If residue is left in a corner, if a steel tool scratches a polished area, or if a clean die is stored without rust protection, the next run may begin with black specks, die lines, leakage, surface streaks or unstable dimensions.
This guide turns the old extruder die maintenance article into a more focused die cleaning workflow. It covers shutdown control, residue removal, safe cleaning tools, material-specific cleaning, inspection, rust protection, storage and pre-installation checks.
For whole-line maintenance rhythm, use the extrusion line maintenance checklist. For screw and barrel cleaning, use clean extruder screw and barrel. This page stays with the die after it is removed or prepared for reuse.
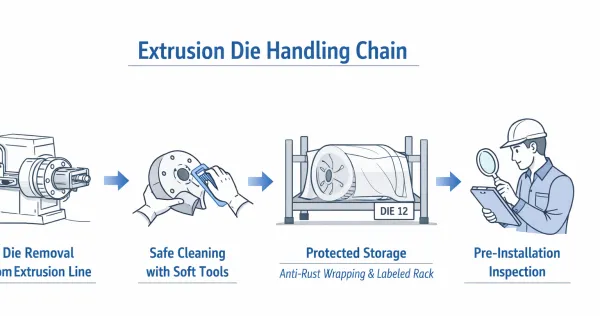
Quick Answer
Clean an extrusion die after shutdown, before long storage, after material or color changes, and whenever startup defects suggest trapped residue. The safe workflow is:
- Stabilize the line before shutdown.
- Purge or reduce material before disassembly.
- Keep the die at a controlled cleaning temperature.
- Remove bulk residue without damaging lips or sealing faces.
- Use brass, copper, wood or approved soft tools instead of steel tools.
- Adjust the method for PE, PP, PVC, engineering plastics, color change or recycled material.
- Inspect die lip, land area, flow channels and corners.
- Classify scratches, carbonized residue, corrosion and coating damage.
- Dry the die and apply rust protection.
- Store the die on a labeled, protected rack.
- Check the die before reinstalling it, and send damaged tooling for qualified repair.
A clean die is not automatically a production-ready die. It must also be inspected, protected and rechecked before reuse.
11-Step Extrusion Die Cleaning Workflow
A good extrusion die cleaning process protects the tool while removing residue. It should be written as a workflow, not as a simple instruction to scrape until the die looks clean.
| Step | What to control | Why it matters |
|---|---|---|
| 1 | Shutdown condition | Prevents hardened residue, pressure risk and rushed handling. |
| 2 | Purge before disassembly | Reduces trapped polymer before the die is opened. |
| 3 | Cleaning temperature | Keeps residue removable without creating burn or handling risk. |
| 4 | Bulk residue removal | Removes the largest material safely before fine cleaning. |
| 5 | Cleaning tools | Prevents scratches on lips, land areas and sealing faces. |
| 6 | Material-specific method | PVC, engineering plastics and recycled compounds leave different risks. |
| 7 | Critical-area inspection | Finds residue and damage where flow quality is controlled. |
| 8 | Risk classification | Separates routine cleaning from repair-level damage. |
| 9 | Rust protection | Prevents corrosion after the die is already clean. |
| 10 | Storage | Prevents impact, dust, moisture and component mix-up. |
| 11 | Reinstallation check | Confirms the die is ready before startup scrap appears. |
1. Control Shutdown Before Die Cleaning
Die cleaning starts before the die is removed. The line should be stopped according to the material and plant procedure, pressure should be reduced safely, and the remaining material should be purged or reduced as much as practical.
The goal is controlled removal. If the die cools too far, residue hardens and operators are tempted to use excessive force. If the die is handled too hot, burn risk and rushed work increase. Good shutdown control keeps residue removable while keeping operators and tooling safe.
Check that lifting support, heat protection, lockout rules and internal safety procedures are in place before the die is opened.
2. Remove Residue in the Right Order
The first rule of die cleaning is not speed. The first rule is to remove residue without changing the die surface.
Remove bulk residue first while it is still manageable. Then clean accessible flow areas, corners, transitions and low-flow zones. Leave delicate areas such as die lips, land surfaces and sealing faces for slow controlled work.
A die can look clean outside and still hold degraded polymer inside a corner. Those deposits may release during startup and appear as black specks or streaks. Clean where melt flows, not only where operators can easily see.
3. Use the Right Extrusion Die Cleaning Tools
The extrusion die cleaning tools should be softer than the die steel or protected surface. Steel screwdrivers, hard scrapers and wire brushes can remove plastic quickly, but they can also leave scratches, rounded edges, dents and sealing-face damage.
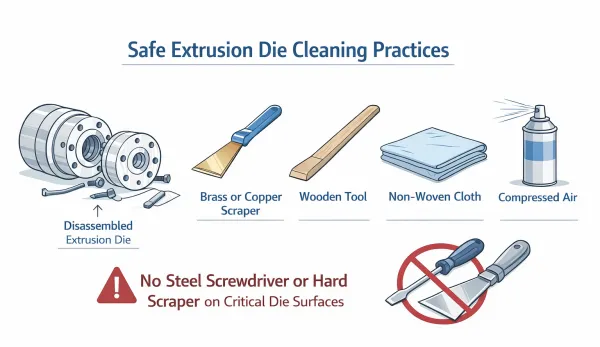
| Tool or method | Use | Caution |
|---|---|---|
| Brass or copper scraper | Remove softened residue from accessible surfaces. | Do not force it into die lips or precision corners. |
| Brass or copper brush | Clean residue from less delicate metal areas. | Avoid aggressive brushing on coated or polished surfaces. |
| Wooden scraper | Lift residue from sensitive surfaces with low scratch risk. | Replace damaged wood that can shed particles. |
| Hard plastic tool | Light residue removal where approved by the plant. | Do not use if it melts, smears or contaminates the die. |
| Non-woven cloth | Final wipe after loose residue is removed. | Use clean cloths only; dirty cloths reintroduce contamination. |
| Controlled compressed air | Remove loose particles from holes and recesses. | Keep pressure controlled and follow safety rules. |
| Approved cleaning compound or heated method | Support difficult materials or repeat cleaning tasks. | Follow supplier and plant procedure; do not improvise on precision surfaces. |
| Steel screwdriver, hard steel scraper, wire brush | Not recommended for precision die surfaces. | High risk of scratches, dents and sealing-face damage. |
After cleaning, place parts on a clean protected surface. Do not stack die components against other metal parts or drag them across a workbench.
4. Adjust Cleaning for the Last Material Run
Different materials leave different residue risks. PE and PP often release more easily, but carbonized material can remain if shutdown was delayed. PVC requires extra caution because overheated or delayed residue can degrade and increase corrosion or contamination risk. Engineering plastics and high-temperature materials may cling strongly and push operators toward over-scraping.
Color-change, recycled or filled-compound runs deserve closer inspection. Pigment, fillers and unstable contamination can remain in low-flow areas even when the visible surface looks clean.
The last material should decide how urgently the die is cleaned, how patient the cleaning method should be, and how carefully the die is inspected afterward.
5. Inspect Die Lip, Land Area and Flow Channels
Cleaning is not complete until the critical flow areas are inspected.
The die lip affects surface formation and dimensional consistency. Look for nicks, dents, rounded edges, scratches, residue near the exit, corrosion marks and impact damage. The land area stabilizes melt before exit, so check it for drag marks, carbonized deposits, wear and discoloration. Flow channels and transitions should be checked for hardened polymer, pigment accumulation, trapped contamination and scratches from tools.
A damaged lip should not be casually polished by an unqualified operator. A small geometry change can create repeated product marks or flow imbalance.
6. Classify Scratches, Carbonized Residue, Corrosion and Coating Damage
A practical inspection should ask what kind of risk remains.
Scratches on flow surfaces can become polymer hang-up points. Scratches near the lip can create repeated lines. Scratches on sealing faces can create leakage. Carbonized residue is a source of black specks and startup contamination, especially after delayed shutdown or material left hot in low-flow areas.
Corrosion can damage polished surfaces, sealing faces and flow-contact areas. Coating or surface-treatment damage should be escalated carefully because aggressive cleaning may make it worse.
7. Finish Cleaning With Inspection, Not Casual Polishing
Routine cleaning should end with inspection, not casual polishing. This language matters on a shop floor. If polishing is treated as a normal finishing step, operators may try to improve die lips, sealing faces or polished flow surfaces by hand.
Instead, confirm that critical surfaces are clean, loose debris is removed, rust or staining is documented, and suspected damage is recorded before storage. If the die is scratched, chipped, rounded, corroded or repeatedly causing defects, the question is not whether someone can touch it up quickly. The question is whether the damage affects flow, sealing, startup stability or product quality.
8. Dry the Die and Apply Rust Protection
A die can be cleaned correctly and still be damaged if it is left exposed after shutdown. Before applying rust protection, confirm that the die is dry, no cleaning liquid remains in corners or threads, and no loose debris is trapped under protective oil or wrapping.
Use a suitable rust inhibitor or anti-rust oil where appropriate for the die material, storage duration and workshop environment. High humidity, seasonal condensation and long storage all increase the need for protection.
Before reuse, remove protective material according to internal procedure so it does not contaminate the next startup.
9. Store the Die for Reuse
Extrusion die storage is part of die cleaning and maintenance. Once a die is clean, the main risks are corrosion, moisture, dust, impact, metal-to-metal contact, component mix-up and missing records.
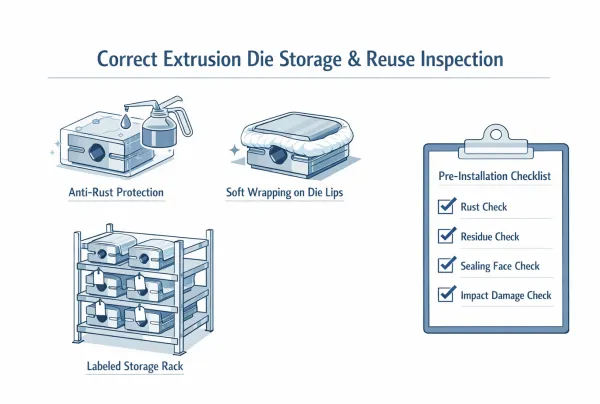
For short-term storage, protect the die from dust, moisture and contact damage. For long-term storage, clean and dry the die fully, apply anti-rust protection, cover it, keep matched components together, label it clearly and check it periodically in humid environments.
Each stored die should show die code, product or application, last material if relevant, last cleaning date, maintenance status, matched components and any damage note.
10. Check Before Reinstalling the Die
A die should not return to the line because it looks clean enough. The pre-installation check confirms whether cleaning and storage were successful.
Before reinstallation, check for rust, dust, remaining protective material, impact damage, scratches, residue in corners or die lips, sealing-face condition, complete matched components, correct fasteners and unresolved maintenance notes.
This check prevents startup scrap and also improves future troubleshooting. If the die condition is known before installation, later defects can be diagnosed with more confidence.
11. Know When Cleaning Has Become a Repair Issue
Routine cleaning covers residue removal, inspection, protection, storage and pre-installation verification. It does not include geometry correction on critical areas.
Escalate the die for qualified repair evaluation if you see damaged lips, scratches on polished flow surfaces, compromised sealing faces, repeated product marks after proper cleaning, recurring startup contamination, impact damage, questionable alignment, critical corrosion or coating damage.
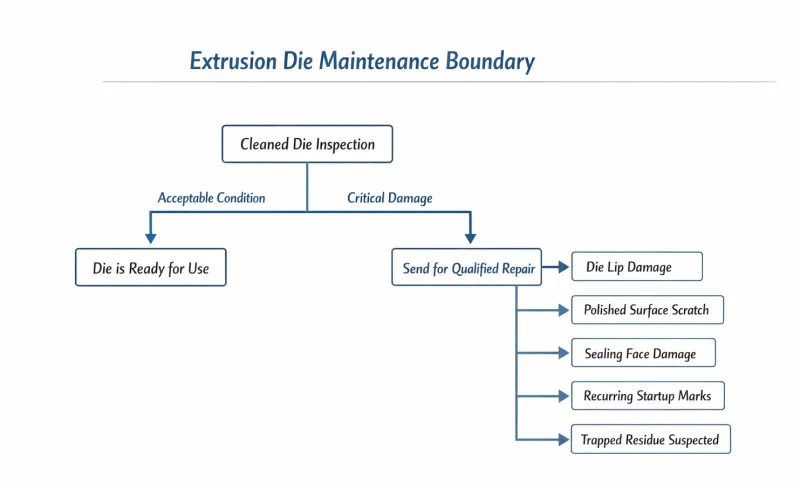
Do not let routine cleaning become unqualified die repair. Repair decisions should be based on tool geometry, product requirements, defect history and qualified inspection. When defects keep returning after correct cleaning and qualified repair, the question can move from the die to the line around it: Jinxin’s custom plastic extrusion lines configure the die together with the product, calibration and downstream equipment.
Die Cleaning vs Troubleshooting
Die cleaning reduces false troubleshooting. Poor cleaning or storage can make the next defect look like a temperature, material, cooling, haul-off or output problem.
| Situation | Use |
|---|---|
| The die has just been removed after shutdown or material change | This extrusion die cleaning workflow. |
| Screw and barrel residue must be removed | Clean extruder screw and barrel. |
| The whole line needs daily, weekly and monthly maintenance rhythm | Extrusion line maintenance checklist. |
| Black specks, die lines, bubbles, wall variation or cutting problems are already visible | Plastic extrusion troubleshooting. |
| The team needs the basic definition of a die or die head | What is an extrusion die in plastic extrusion. |
If black specks or surface streaks repeat after cleaning, include die handling history in the troubleshooting path. For the defect-specific route, see black specks in extrusion.
FAQ
How often should an extrusion die be cleaned?
Clean it after shutdown, material change, color change, long storage, visible buildup or any startup defect that suggests trapped residue. High-temperature materials, PVC, recycled compounds and appearance-sensitive products usually need tighter cleaning discipline.
What are the safest extrusion die cleaning tools?
Use brass or copper scrapers, brass or copper brushes, wooden scrapers, approved plastic tools, clean non-woven cloths, controlled compressed air and approved cleaning compounds or heated methods. Avoid steel screwdrivers, hard steel scrapers and wire brushes on precision die surfaces.
Why does PVC residue require extra caution?
PVC residue can degrade more aggressively if it is overheated or left sitting too long. Delayed cleaning can increase black-speck, corrosion and startup contamination risk, especially in corners, lips and low-flow areas.
Can a die be polished after cleaning?
Routine cleaning should finish with inspection, not casual polishing. Polishing critical surfaces without qualified control can change die geometry and create repeated product defects.
What die areas should be checked before reinstallation?
Check die lips, land areas, flow channels, corners, sealing faces, bolt holes, matched components, visible critical surfaces and any previous maintenance note.
Can poor die cleaning cause black specks or surface streaks?
Yes. Carbonized residue, trapped pigment, scratched flow surfaces and dirty low-flow areas can release material during startup and create black specks, streaks or repeated marks.
Can die condition affect wall thickness stability?
Yes. Flow-channel blockage, die-lip damage, uneven residue and poor reassembly can affect flow balance. Cooling, calibration and haul-off still matter, but die condition should be checked when instability appears after die handling.
When should a die be sent for professional repair?
Send it for qualified evaluation when lips, polished flow surfaces, sealing faces, coatings or critical geometry are damaged, or when defects repeat after proper cleaning.

Jason Shen
Founder and Lead Engineer, Jinxin ExtruderJason Shen leads Jinxin Extruder's single screw extrusion line projects, with hands-on experience in machine configuration, tooling adjustment, factory testing and extrusion troubleshooting.
Inquiry
Email Your Line Requirements
For an accurate quotation, include your target product, material, size range, expected output, factory voltage and any product drawing or sample requirements.